Monday, 28 March 2016

AICP ROM based on CyanogenMod 12.1 for Lenovo P70


custom rom lenovo p70 aicp cyanogenmod 12

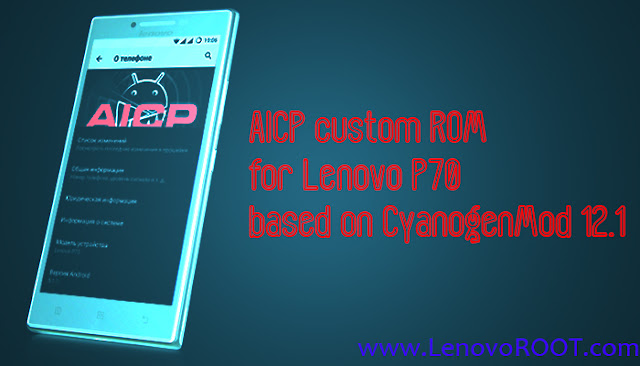
 So, here's the another custom ROM for Lenovo P70 which is called AICP it's based on CyanogenMod 12.1 but it provides amazing custom features, custom kernel and huge overall improvements.
AICP ROM is stable for daily use, supports 3 languages - English, Russian, Ukrainian.

Features of ROM: 
  • Build date: 2/1/2016
    Supporting Languages: English, Russian, Ukrainian
  • Android 5.1 (64 bit)
  • Includes Recovery TWRP SevenMaxs v2.8.7.7 x64 kernel. 
  • There's init.d support (needed BusyBox to work).
  • Stable Wifi, GPS
  • Fresh firmware.
  • No slow down
  • Not buggy
  • Fast & Smooth
  • There is the possibility to set up almost everything:
  • - Panel of recent applications (cleaning button, memory mapping, OmniSwitch);
  • - Menu and Desktop (sorting, animations, captions, application lock);
  • - The interface (DPI, the animation of the system, and scroll notifications effects);
  • - Turn off the menu (setting off the menu items, advanced reboot menu);
  • - The status bar (battery display, time and date, carrier logo, weather, network traffic);
  • - Notification bar (sorting and setting the number of tiles, color, action, task manager);
  • - Advanced settings (built-Tuning program, ad blocking, SuperSU management built-in settings);
  • - Application Panel (side \ circular panel gestures to launch applications, Pie-navigation, waking the processor lock);
  • - Buttons (backlight control buttons, the setting on the lock screen, setting short and long press on each button);


Features of Kernel: 
  • Also init.d on kernel
  • The kernel supports CIFS, NTFS, EXT,FAT. 
  • Added BFQ scheduler.
  • Fixed display voltage battery in the CM
    Kernel supports the following key combinations for emergency stop, if you get bootloop:
    1. 8 seconds hold Power
    2. 8 seconds hold Power + Vol -
    3. 8 seconds hold Power + Vol +

What's working:
  1. Everything except:
  2. FM-radio;
  3. It does not work mode access point;
  4. Do not run live wallpapers;
  5. No access to the Engineering menu;
  6. There is no program to adjust the screen brightness,contast,color - MiraVision;
  7. No connection to the PC mode - Mass storage (USB-stick);
  8. The audio settings and notifications, there are two identical ringtone: Themos and Titania;
  9. Widget "Next Steps" is not added to the desktop (leading to Settings error);

 How to install AICP custom ROM on Lenovo P70:

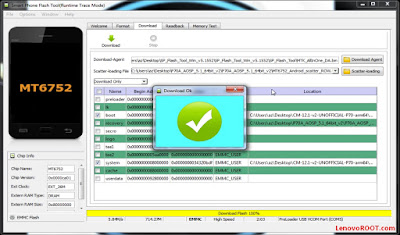
  • Again Installation thought SP FLASH TOOL
  • Before flashing this ROM you need to flash AOSP 64bit ROM - download here
  • Follow step from CyanogenMod 12.1 flashing in this post it's the same instructions!
  • If you think it's not clear check out below video tutorial

Download AICP v1 ROM - here


Here's the video tutorial of installing CyanogeMod 12.1 on Lenovo P70

advertisment

AICP ROM Lenovo P70 compiled by Zormax. 
Android Lollipop 5.1 64bit by Zormax. 
Tutorial by GaDDMaNN

Stickynotes installieren | Ubuntu 16.04 | Anleitung

Digitale Klebezettel auf dem Desktop sind natürlich auch unter Ubuntu 16.04 möglich.
Ein sehr kleines aber für mich persönlich mehr als nützliches Tool, um schnell ein paar Notizen zu erstellen!
Für die Installation ruft Ihr das Terminal auf und führt diese Befehle aus (wie geht das?):

[1] sudo apt-add-repository ppa:umang/indicator-stickynotes
[2] sudo apt-get update
[3] sudo apt-get install indicator-stickynotes
Nach der Installation könnt Ihr Stickynotes über die Dash aufrufen.
Im Grunde gibt es hier nicht viel zu erklären...
Die Einstellungen findet Ihr über dem Panel, wie oben im Bild zu sehen.

Chrome installieren | Ubuntu 16.04 | Anleitung

Der Chrome Browser ist unter Ubuntu 16.04 sehr wichtig! Adobe liefert nur noch Sicherheitsupdates für den Adobe Flash Player - unter Linux - aber keine neue Version...
Das führt oft zu Problemen beim Abspielen von Flash-Inhalten (allgemein unter Linux). Der Chrome Browser löst das Problem, da dieser seinen "eigenen Flash Player mitbringt".
Auf der Homepage, unter Download, werden euch mehrere Versionen angeboten. Wir wählen für Ubuntu 16.04 die .deb Datei aus und laden diese herunter.
Solltet Ihr euch nicht sicher sein, ob 32 oder 64- bit, dann bitte hier schauen.
Nach dem Download öffnen wir die heruntergeladene Datei mit dem Software-Center.
Hier klicken wir auf Installieren und warten.
Nach der Installation können wir Chrome per Dash öffnen.
Wie gesagt, oft könnt Ihr im Forum lesen "die Videos werden unter Ubuntu nicht flüssig abgespielt" und das liegt nicht an Ubuntu...

Kodi installieren | Ubuntu 16.04 | Anleitung

Um Kodi unter Ubuntu 16.04 zu installieren - bitte das Terminal aufrufen und diese Befehle ausführen (wie geht das?):

[1] sudo add-apt-repository ppa:team-xbmc/ppa
[2] sudo apt-get update
[3] sudo apt-get install kodi
Das wäre nur Kodi, ohne weitere Erweiterungen/Codecs.
Wer IPTV schauen will, der benutzt bitte diesen Befehl:
[3] sudo apt-get install kodi kodi-audioencoder-* kodi-pvr-*
Sollte nur die eigene Filme/Serien/Musik Sammlung von Interesse sein, dann diesen Befehl verwenden, damit alles abgespielt werden kann:
[3] sudo apt-get install --install-suggests kodi
Kodi könnt Ihr dann nach der Installation über die Dash aufrufen.
Um Updates müsst Ihr euch dann keine Sorgen mehr machen (kommen direkt über das System).

Spotify Client installieren | Ubuntu 16.04 | Anleitung

Um den Spotify Client unter Ubuntu 16.04 zu installieren, ruft Ihr das Terminal auf und führt diese Befehle aus (wie geht das?):

[1] echo deb http://repository.spotify.com stable non-free | sudo tee /etc/apt/sources.list.d/spotify.list
[2] sudo apt-key adv --keyserver hkp://keyserver.ubuntu.com:80 --recv-keys BBEBDCB318AD50EC6865090613B00F1FD2C19886
[3] sudo apt-get update
[4] sudo apt-get install spotify-client
Nach der Installation könnt Ihr Spotify über die Dash aufrufen.
Der Linux Spotify Client hat die Testphase verlassen - somit wird es keine Probleme mehr geben, wie noch unter der alten Version.

Gastzugang deaktivieren | Ubuntu 16.04 | Anleitung

Von Werk aus gibt es unter Ubuntu 16.04 einen Gastzugang.
Wenn Ihr diesen deaktivieren wollt, dann ruft das Terminal auf und führt diesen Befehl aus (wie geht das?):

[1] sudo gedit /usr/share/lightdm/lightdm.conf.d/50-ubuntu.conf
Nach dem Ausführen öffnet sich ein Fenster...
Hier bitte in der dritten Zeile dies allow-guest=false einfügen und dann oben rechts im Fenster auf Speichern klicken.
Nach einem Neustart gibt es den Punkt Gastzugang nicht mehr.
Wenn Ihr den Gastzugang wieder aktivieren wollt, dann einfach so vorgehen, wie oben beschrieben und Zeile 3 entfernen.

Saturday, 26 March 2016

MWC 2016: Samsung's Galaxy S6 edge got best smartphone of 2015 awards


The Samsung Galaxy S6 edge has won the best Smartphone of 2015 award in 2016 Mobile World Congress in Barcelona  . 


No doubt S6 edge was the best smartphone with unique features and specifications . 


Along with Galaxy S6 edge , Gear S2 smartwatch  was named "Best Connected Consumer Electronic Device" in the Best Mobile Handsets & Devices category .

via


Android 6.0.1 Marshmallow rolling out for Sprint Samsung Galaxy S6 edge +


Sprint is finally rolling out Android 6.0.1 Marshmallow update to Samsung Galaxy S6 edge + in the regions  . 


Image via 

The Update is of 1.4 GB and will update your Samsung Galaxy S6 edge + to Android 6.0.1 Marshmallow . The Update comes integrated with 1 March Security patch. 


via

Friday, 25 March 2016

JDownloader 2 installieren | Ubuntu 16.04 | Anleitung

Hier wird euch erklärt, wie der JDownloader 2 unter Ubuntu 16.04 installiert wird.
Auf der Homepage (externe Link) müsst Ihr euch erst einmal JDownloader 2 für Linux herunterladen.
Hier werden euch zwei Versionen angeboten.
Download Installer (x86) = 32-bit Version 
Download Installer (x64) = 64-bit Version
Solltet Ihr nicht wissen, welche Version für euch die richtige ist, dann bitte hier prüfen.
Nach dem Download in das Verzeichnis wechseln -->
Rechtsklick in einem freien Feld --> Im Terminal öffnen
Im neuen Terminalfenster schreibt Ihr sudo sh und verschiebt die heruntergeladene Datei ins Terminalfenster.
Jetzt den Ordner schließen und im Terminal den Befehl mit Hilfe der Entertaste bestätigen.
Nach kurzer Zeit öffnet sich das Installationsfenster vom JDownloader 2.
Wichtig ist nur das bei diesem Punkt (wo JDownloader installiert werden soll - nicht wo die Downloads am Ende landen) nichts verändert wird!
Nach der Installation könnt Ihr das Terminalfenster schließen und über die Dash den JDwonloader 2 aufrufen.
Sollten beim Start Fehlermeldungen erscheinen oder der JDownloader erst gar nicht starten, dann müsst Ihr mit dem Befehl (wie geht das?):
[1] sudo chown -R -v $USER /opt/jd2
Das Problem lösen.

Audio Recorder installieren | Ubuntu 16.04 | Anleitung

Ein kleines aber sehr nützliches Tool für Audio-Aufnahmen unter Ubuntu 16.04 wäre der Audio Recorder. Für die Installation das Terminal aufrufen und diese Befehl ausführen (wie geht das?):

[1] sudo add-apt-repository ppa:audio-recorder/ppa
[2] sudo apt-get update
[3] sudo apt-get install audio-recorder

Nach der Installation könnt Ihr über die Dash den Audio Recorder aufrufen.
In meinem Fall startet dieser immer mit Ubuntu 16.04 mit (könnt ihr natürlich unter den Einstellungen deaktivieren).
Unter zusätzliche Einstellungen bzw. über die Pfeiltasten könnt Ihr weitere Einstellungen aufrufen und den Audio Recorder anpassen bzw. die Audioquelle auswählen.

Oracle Java 8 installieren | Ubuntu 16.04 | Anleitung

Wer Oracle Java 8 unter Ubuntu 16.04 installieren möchte, der kann das dank webupd8.org ganz leicht tun. Dazu das Terminal aufrufen und diese Befehle ausführen (wie geht das?)

[1] sudo add-apt-repository ppa:webupd8team/java
[2] sudo apt-get update
[3] sudo apt-get install oracle-java8-installer
Anders als sonst müsst Ihr beim Terminal genau hinschauen.
Ihr müsst die Lizenzbedingungen mit Ja akzeptieren (hier arbeitet Ihr mit den Pfeiltasten und der Entertaste), sonst wird die Installation abgebrochen...
So lange warten, bis Ihr dieses Bild vor euch habt:
Ist das der Fall, dann geht es so weiter:

[1] sudo apt-get install oracle-java8-set-default
Jetzt könnt Ihr mit Java arbeiten.
Ihr könnt das Terminal (wie im ersten Bild) abfragen, was installiert ist. Dazu einfach diese zwei Befehle verwenden:

[1] java -version
[2] javac -version

Skype installieren | Ubuntu 16.04 | Anleitung

Um Skype unter Ubuntu 16.04 zu installieren, bitte das Terminal aufrufen und diese Befehle ausführen (wie geht das?):

[1] sudo add-apt-repository "deb http://archive.canonical.com/ $(lsb_release -sc) partner"
[2] sudo apt-get update
[3] sudo apt-get install skype && sudo apt-get -f install
Nach der Installation könnt Ihr über die Dash Skype aufrufen
Sollte es Probleme mit Skype geben, dann bitte Rechner neustarten (wenn zum Beispiel Skype sich nicht öffnen lässt).
Danach gab es aber keine Probleme mehr!

Tuesday, 22 March 2016

CyanogenMod 12.1 for Lenovo P70

cyanogenmod 12 for lenovo p70

Ohhhhhhhhh yeah CyanogenMod 12.1 for Lenovo P70 that's amazing.Fastest and smoothest custom ROM ever developed is CyanogenMod and available for Mediatek based Android device Lenovo P70 with MTK6752.
Almost any user want to have and use CyanogenMod ROM on their Android device but CyanogenMod firmware is specific for some chipset, cpu, so, so... as well as needed to be build for each one individually and that's not easy effort and for thus it not available for every every Android device.

Well, in this post I'll show you How to install CyanogenMod 12.1 on Lenovo P70-A.
It's 64bit for Lenovo's P70 CPU MTK6752 and working amazing, very smooth with great features developed from CyanogenMod.


As I said it's 64bit based ROM and you need first to install Andoid Lollipop 5.1 64bit then CyanogenMod otherwise it will not work.

Warning: Before anything to do make sure you've backed up your files from internal memory like pictures,documents,apps etc. all information will be erased as well as current firmware on your Lenovo P70 when you flash firmware via Sp flash tool.DO IT AT YOUR OWN RISK!

So, let's begin :

download required files:
- Android Lollipop 5.1 64bit for Lenovo P70 - link
- CyanogenMod 12.1 64bit for Lenovo P70 - link
- Sp Flash Tool for Lenovo P70 - link
- Drivers for Lenovo P70 - link
- Gapps CyanogenMod 12.1 64bit for Lenovo P70 - link (put into SDcard or internal memory
- Root zip - link  (put into SDcard or internal memory)

1. After downloading of files, unpack them somewhere.
2. Install at first drivers for Lenovo P70.
3. Then open flashtool exe from (Sp Flash Tool) and load scatter file from (Android Lollipop 5.1) folder.

how to install cyanogenmod 12 lenovo p70
 4. All image files will be loading into Sp flash Tool there's only system.img & boot.img then press Download button and plug in the USB cable to Lenovo P70 and then PC.

cyanogemod 12 lenovo p70

5. After flashing of first Android Lollipop 5.1 64bit again make following:
6. Load scatter file from CyanogenMod 12.1 folder and again files loaded then press Download button and plug in the USB cable to Lenovo P70 and then PC.

cyanogemod for lenovo p70


install cyanogemod lenovo p70


7. Boot up into Recovery by pressing Volume up + Power button then on screen scroll up to recovery with Volume up and select with Volume down to enter into recovery.
8.It's time to flash from recovery Gapps (It's zip package with Google applications: PlayStore, Google+, Youtube etc.) and Root zip.
Go to install and locate the gapps zip if you put already into external card if not plug USB cable and then copy from PC to Lenovo P70.
Make same for Root zip package!
10.Reboot system and Enjoy!
That's it you now would've CyanogenMod 12.1 on Lenovo P70 :) 

If you get an error on Sp Flash Tool PMT changed for the ROM it must be downloaded 
try with one of these scatter files:

1. Scatter from firmware Stock Lenovo P70 S134 Android KitKat 4.4 - link
2. Scatter from firmware Stock Lenovo P70 S139 Android KitKat 5.1 - link
3. Some other scatter - link


Here's the video tutorial of installing CyanogeMod 12.1 on Lenovo P70

advertisment

CyanogeMod Lenovo P70 compiled by Zormax. 
Android Lollipop 5.1 64bit by Zormax. 
Tutorial by GaDDMaNN 

What's not working in this build:
- FM radio
- Miravision
- Engineer menu!